

Thanks to student input and field testing there have been some substantial revisions to the Sea Hawk endoskeleton. This meets our goal of having stakeholder involvement in the development of this robotics program "of the people, by the people, for the people."
In particular we have seen a lot of parent-advisor involvement in the development of this program, which is a dream come true for those of us in the teaching profession. In terms of Sea Hawk design we appreciate the contributions of Venice High School Robotics Club parent adviser Annette Mercer who suggested, among other things, the use of an easy to obtain tangerine mesh bag to hold the wing bottle floats and zip tie them to the endoskeleton, and the contributions of Washington Preparatory High School Robotics Club parent adviser Roy Harper who suggested, among other things, the use of a gallon milk jug in place of the three water bottles we were using for the front floatation of the craft because of its appropriate volume and the ease with which it attaches to the endoskeleton with a zip tie. Naturally the students and teachers themselves had many great suggestions for improving the robo-boat. The collaborative process for innovating simple but effective improvements through involvement and engagement by parents, students and teachers, is one of the hard to quantify yet most important results of a program designed not for but along with the end users of a STEM curriculum.
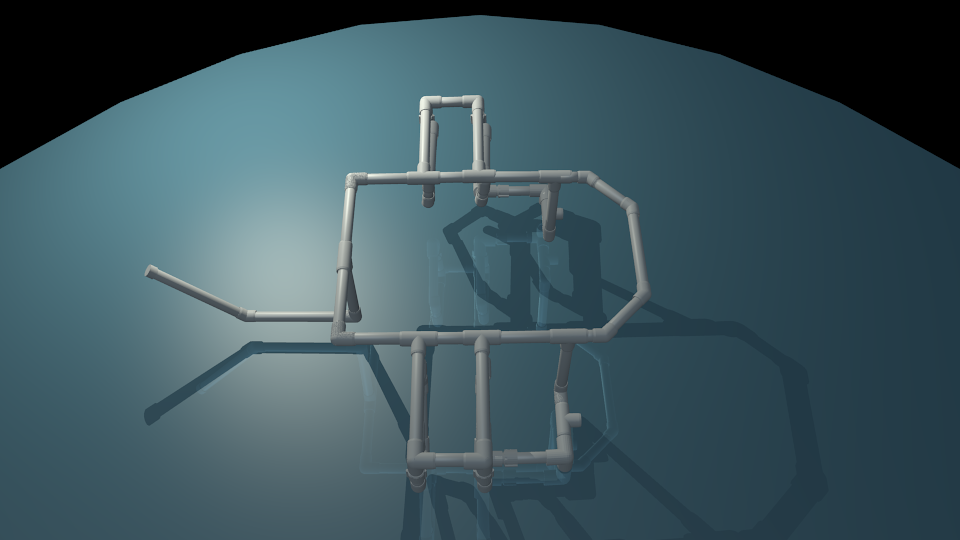
On this page you will find photographs and 3D diagrams and a new tutorial on how to build the Sea Hawk.
First, the 3D images:


Note one more revision that is not in the images above -- a downward facing T placed on the bottom of the bow brace at the bottom next to the elbow. This serves as a mounting point for a castor or wheel (without a motor) that will keep the Sea Hawk the same height above ground when you do put motorized wheels on the rear downward facing Tees, and will enable the craft to be driven around the classroom.
Here are some pictures to help you translate the 3D images into the real world:
 |
| The first thing we have to avoid is the possibility of the vessel capsizing. To avoid the situation we see in the photo above we increased the robusticity of the bottle float holding wings and secured all the PVC pipes and the bottles themselves with zip ties. This way the craft can be disassembled for transport and then reassembled in the field. |
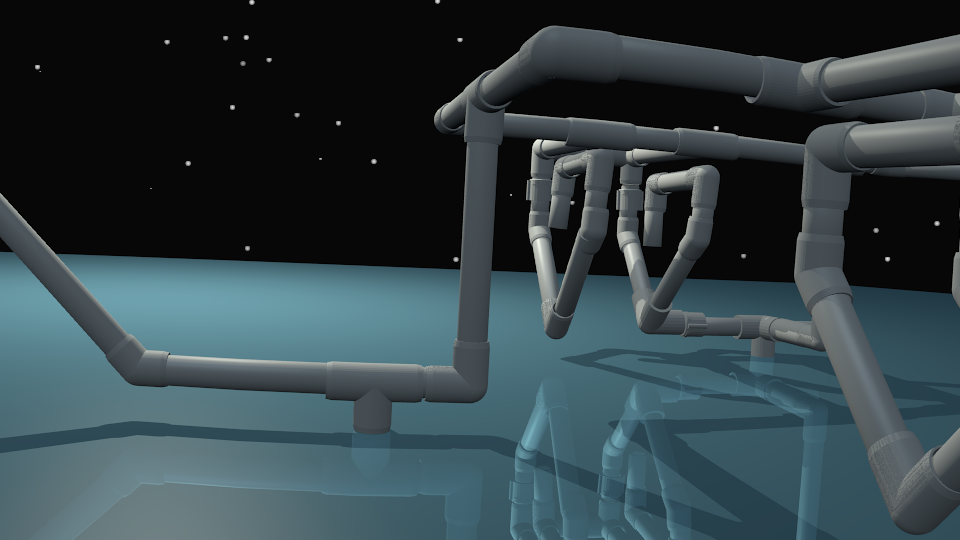
Additional wing and motor support
 |
| The wing configuration was changed to have extra support for the bottles and is now connected to the main frame so that the motors have more stability. |
 |
| The back brace has a backward facing T for the propeller motor mount and a bottom facing female screw plug on a three way joint acting as a stand when the craft is out of the water; this location can also be used for mounting a wheel motor for driving the craft in a classroom. |
Use of milk gallon jug for stern flotation
 |
| A gallon milk jug for front flotation was suggested by Roy Harper, the parent advisor to the Washington Prep High School Robotics club. It is easy to obtain and easy to zip tie, from its handle, to the front endoskeleton support. It then fits nicely inside the nose of the Sea Hawk. |


Use of fruit/vegetable mesh bag to hold port and starboard wing flotation bottles and zip tie them to craft.
 |
| One of the most important simple improvements is the use of a mesh bag to hold the bottle and zip tie it to the endoskeleton. Annette Mercer, the parent advisor to Venice High School Robotics Club, happened to have a bag of tangerines with her when we were looking for an inexpensive and simple solution and suggested we try it. It works like a charm, and they are really easy to get in most grocery stores (if they don't have them for tangerines or oranges, try the potato section!) |


Use of LA Robotics Club Ardbot classroom vehicle for testing of code to be used on Sea Hawk
 |
| The LA robotics club ardbot allows students to test code for movement and sensors on the arduino on a table top. This code, with only slight modifications, can then be downloaded to the arduino on the Sea Hawk. This enables us to go from classroom to ocean fairly easily. |

Use of zip ties for portability and quick dissaembly/assembly
 |
| The students of Venice High School Robotics Club decided that zip ties would be the best way to hold the craft together without using any PVC glue. We had asked them for a solution to the problem of getting a Sea Hawk to the high glacial lakes in remote areas like Nepal. They reasoned that nuts and bolts would take far too long to assemble and dissassemble and might rust. They would also be heavy. Plastic zip ties, on the other hand are cheap and lightweight could go through small holes and be quickly pulled tight; when the craft needed to be taken apart and thrown in a duffel bag they could easily be snipped and pulled off. Their hunch was right. |
 |
| Though merely held together with zip ties (no PVC glue used so craft can be completely disassembled for transport in a small duffel bag when riding a bus or flying to Nepal and trekking through the Himalayas to glacial lakes!) the Sea Hawk is sturdy enough when assembled with all its electronics to be easily carried to the testing site. |


 |
| One hand holds the Sea Hawk, the other a bag with the laptop in it that will control the craft. |
 |
| Here the craft is ready to go in the water. It is piloted from the keyboard of the laptop using an Xbee. The rope in the picture is merely to be able to recover the craft in the event of a battery or other electronic failure. |
 |
| The Xbee on the craft can be seen in the open box on the bow of the ship. It is mounted on a motor shield that controls the two propellors which in turn is mounted on an Arduino Uno. The batteries for both the Arduino (9V) and for the motor shield (11.1 V) are in the rear box in front of the staboard robotic claw. |
 |
| The setup ready to go. |
 |
| The craft is launched in the water and steered using the game control keys on the keyboard. |
 |
| The craft, using Sea Perch style Jameco motors (.6 amps) has a hard time moving against the wind and current. This suggests the importance of moving up to 1.2 amp motors for any practical use and not using the same motors as the Sea Perch. Also, without the extra control boxes for the Sea Perch, which was not used in this test, the gallon jug provides a bit too much buoyancy. For similar tests an easy solution is to put some water in the milk jug before starting, or use a half gallon orange juice jug (we like jugs with handles because they are easy to zip tie to the stern endoskeleton piece). |
 |
| The craft on its way, heading out to sea. Note this craft has no sensors because we hadn't worked out the best way to waterproof the sensors on this day. |
 |
| The teacher pilots the craft from the laptop while walking around (operating distance turned out to be more than 50 meters) as his son maintains the tow rope in case there is a problem. |
Benefits of real world testing
One of the nice things about taking out a roboboat into public space for testing is that kids and their families quickly get involved and the testing day turns out to be an outreach/educational opportunity.
At Balboa Park on a Sunday many kids got interested in the project, like these young visitors from Atlanta, Georgia who were seeing relatives in L.A. They helped with the tests and asked if they could implement PORPOISE in their own schools when they got home.
 |
| One of the young people, and his mom, at the park who volunteered to help with the test. |
|
 |
| The boy's cousin decides robotics are fun too! |


No comments:
Post a Comment