|
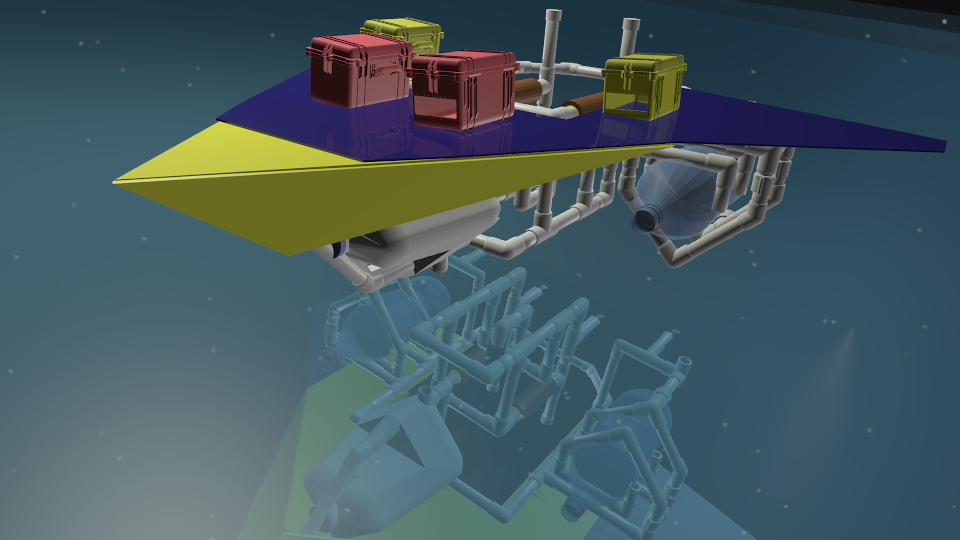
| The complete Sea Hawk/Sea Perch configuration (shown without wires or zip ties) |
In this section you will learn how the Sea Hawk/Sea Perch platform is configured.
The Sea Hawk Skin, made of two layers of corrugated plastic, is zip tied to the endskeleton.
The hacked Sea Perch docks inside the opening in the Sea Hawk with the grappling poles to the rear.
Four large otter boxes are placed on the Sea Hawk deck. The ones on the wings, shown in yellow, contain the batteries (each yellow box has a 9V battery for the Arduino microcontroller, a 11.1 V battery for the propellor motors and 2 6 V battery packs for extra servos.. In this way the contents of the yellow boxes are identical.)
The otter boxes on the front deck, shown in red, hold the Arduinos and their corresponding motor shields and wireless transceivers. The one on the starboard side we designate for the Sea Hawk. The one on the port side we designate for the Sea Perch.
In the artist's rendering above, two Arduino Unos are shown sitting on top of the Otter boxes they will eventually go in.
The rendering above gives a closer look at the relative sizes of the microcontrollers and the otter boxes.
In the rendering above we shown the beginning of the "Arduino sandwhich" that will go in each box. The Arduino on the left has an Adafruit Motor Shield stacked on it. This is identified by the three 16 pin IC chips on the board. The one on the bottom and the top are Dual "H-bridge" motor controllers, each one corresponding to a separate channel or "bridge" that can take two motors and up to 1.2 amps current. The specifications say, "4 H-Bridges: L293D chipset provides 0.6A per bridge (1.2A peak) with thermal shutdown protection, 4.5V to 25" The Adafruit also has connectors for up to two servos and so it can be used to run the robotic claws that hold the Sea Perch in place. We've chosen this shield for the Sea Perch because it can handle all three Sea Perch motors and the robotic claws, albeit running at different times so as not to overload the board. The specs say, "
Up to 4 bi-directional DC motors with individual 8-bit speed selection (so, about 0.5% resolution)
Up to 2 stepper motors (unipolar or bipolar) with single coil, double coil, interleaved or micro-stepping.
2 connections for 5V 'hobby' servos connected to the Arduino's high-resolution dedicated timer - no jitter!"
We are using 3 Jameco bi-directional 0.6A DC motors for the Sea Perch and 4 servos; two of the servos (the one's opening and closing the claws) will be run off of the Adafruit, drawing their 5V power from the same 11.1 Volt battery that powers the Sea Perch motors. The two other servos, controlling the 'wrists' of the robotic claws, will be run from pins on the Arduino board and require their own battery sources (a separate battery pack for each servo).
On the right we see the begining of a motor shield for controlling the Sea Hawk propeller motors. This shield is not yet populated with all its electronic components and is used for illustration purposes only.
Above is a picture of the Adafruit motor shield mounted on the Arduino and connected to some of its possible motors and servos. The adafruit comes as a kit and must be assembled by the student (a great learning experience). The kit can be ordered here:
http://www.adafruit.com/products/81
Instructions for building the motor shield can be found here:
http://www.ladyada.net/make/mshield/solder.html
The picture shows a green shield, my rendering shows a red shield (reminiscent of Spark Fun) but the real kit now comes in blue! Just sayin...
Below are some pictures of some of the infrastructural finishes for a floating moving craft:
 |
| Here the motor mounts have been added to the Sea Perch at the 3 Tee positions. |
 |
| It is a bit easier to see from the side. Note that the motor mounts are 3" pieces of 1/2 inch PVC with the top part of the last two inches cut out so the motors can be taped to them with duct tape. |
 |
| We add the same motor mounts to the back Tees of the Sea Hawk endoskeleton. |
 |
| At sunset, in the evening light, it the contrasting shadows make it easier to make out how the motor mounts are cut. |
 |
| This picture was also taken when the sun was setting in the virtual world. You can clearly see how the motor mounts look and their ideal orientation. |
 |
| The Sea Perch docked into the Sea Hawk with their motor mounts attached and with the Sea Hawk Skin attached. |
 |
| The Sea Hawk frame with the two side bottle pontoons. |
 |
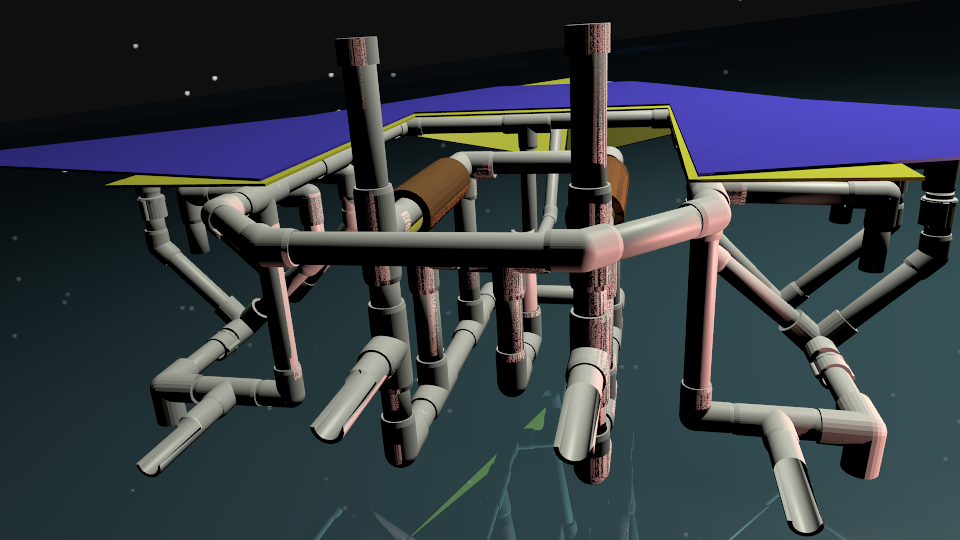
| Here we see the PORPOISE-pimped Sea Perch with its motors attached and the Sea Hawk with its motors attached. In this Blender file I didn't bother to add the wires or the electrical tape that we use to strap the motors (in their film canisters) to the motor mount. We also see here the insertion of the 2 liter water bottles into the wing holders. I haven't bothered to show the mesh tangerine bag that we use to zip tie them to the wings, nor the zip ties themselves. Use your imagination!
|
 |
| Here is a rear view of the motors and the side water bottle floats. It shows that the Sea Perch can help drive the Sea Hawk; in fact you could forget the motors on the Sea Hawk and just use the Sea Perch to drive itself and the Sea Hawk into position, letting the Sea Hawk just float around while the Sea Perch dives, but how fun would that be (not!). Besides, the Sea Perch motors are generally too weak to move the Sea Hawk very fast or far so all they can really do is give a boost. |
 |
| Here is the same angle as above but with the Sea Hawk skin added and the motos removed. |
 |
| Here is the same picture as above, but with the Sea Hawk deck skin and the motors attached.. |
 |
The skin and motors added but the bottles removed.
The Sea Hawk motors are twice as powerful as the Sea Perch
motors, but their set up (wiring and water proofing by sealing with electrical tape and placing in a film or pill canister with toilet bowl wax) is
identical.
The only exception is
that we save time by buying propellers that can be mounted on the shaft of the
motor with a small Allen screw. We buy them in hobby shops. They look like this:
When buying propellers, MAKE SURE YOU GET A LEFT PROPELLOR
AND A RIGHT PROPELLOR. Otherwise
your Sea Hawk will go around in circles!
Craft with two propellers use a principle called “counter-rotation” in
which the propellers spin in opposite directions (but always with dual forward
thrust or dual backward thrust) so that the craft can go straight and not be
biased by the direction of turn of the propellor.
For more info on this principle see
|
 |
| A top view of the Sea Perch/Sea Hawk hybrid with the 4 Otter Box 2500 series mounted. In this picture the Arduino boards and their motor shields are sitting on top of the boxes they will go in. In real life they would be inside the Otter boxes, safe from the elements! |
 |
| In this rendering we add the 1 gallon milk jug to the prow of the ship. Place it with the handle facing down and zip tie the handle of the jug to the PVC pipe beneath it. You need to have some flotation in the front of your ship as the side wing bottle pontoons will not support the weight of the front. If, after you have put the batteries and controller boards on the Sea Hawk the front rides too high in the water you can try using a half gallon milk or orange juice jug (with a handle for the Zip Ties) instead. Or you can put some water in the gallon milk jug to precisely adjust its buoancy. Or you can put a weight (a mast head ? A wooden mermaid?) on the prow of the ship. |


 |
| No, these aren't imperial star cruisers on their way to blast the rebel alliance on Endor, these are the two "Arduino sandwhiches" you will be using. The one on the left is an Arduino Uno with an Arduino Motor Shield (which you can pick up at Radio Shack for 35 bucks) for running the Sea Hawk motors. The one on the right is the Arduino Uno with an Adafruit Motor Shield for running the Sea Perch. |
 |
| Here are the motor shields seen from the top. I did my best to populate them with the visible chips and connectors but left out all the tiny surface mounted resistors, capacitors, voltage regulators etc. They won't be necessary for following the tutorial, so why bother putting them in? |
Hooking up the Batteries:
 |
| This image shows how the batteries would be hooked up if they were floating in outer space. But they aren't. |
 |
| Here is how the 12V batteries that power the motors are hooked up to their respective motor shields. |
 |
| Note that the Adafruit motor shield, used for powering the Sea Perch Motors, hooks up to the screw terminal on the side. Make sure and observe polarity so you don't blow things up! |
|
|
 |
| Note that +M (for positive) and GND (for ground) are marked above the screw terminals on the circuit board. |
 |
| For the Arduino Motor Shield you run the 12V battery wires into the right most set of screw terminals along the row. But BE CAREFUL! You must read the polarity silkscreened on the board. In this case, with the board oriented the way we have it, Vin (or Voltage In, which stands for +) is ABOVE the GND terminal. That is why in our 3D rendering above the red and black wires from the battery CROSS. It can be misleading because the other screw terminals, which go to the motors of the Sea Hawk, have the negative above the positive. |
 |
| In this close up you can see how the battery wires hook up to the Arduino Motor Shield. |
|
|
|
|
Our next series of pictures will show how the motors are hooked up to the Motor Shields. Stay tuned!